Interested in how to draw anime for beginners? Well, we’ve compiled simple step by step guide to draw anime along with our drawing anime tips.
Anime characters have exaggerated eyes, distinct features, and proportions. There are a few unmistakable traits of well-drawn anime characters, and we intend to give you some beginner steps to learning how to draw anime.
The head of anime characters is usually a bit bigger than that of a realistic head, but not too big that it becomes a caricature (Although, in some cases, anime characters are drawn with a head larger than the rest of their body. These are called “Chibis“, which is a smaller and more adorable version of an anime character.)
Link: If you are interested in learning what tools you need to draw anime or manga check out our post here.
First, draw a circle then create a vertical line in the middle of the circle. Right below the circle, draw a horizontal line. This will be the basis for the chin. Unlike a realistic head, the shape of an anime character is more easily defined. The chin is a lot sharper and the forehead is a bit bigger.
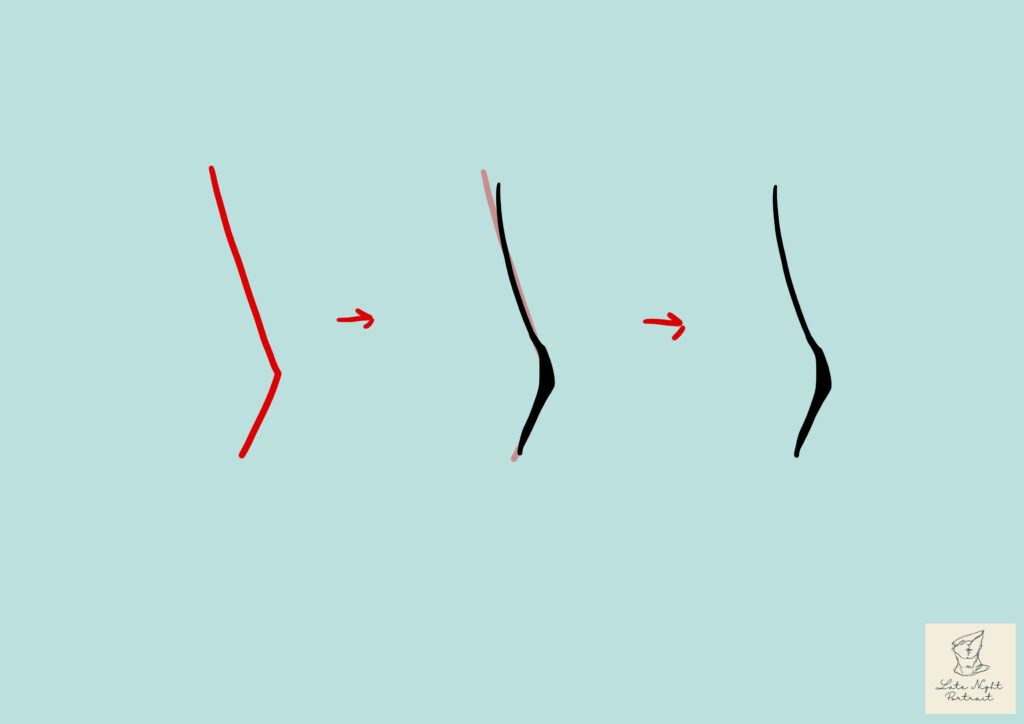
Now that you have your guide, connect the circle to the line, and from there create two slopes that’ll interconnect to make the chin.
Once you have a head, create the neck and shoulder.
Step 2. Draw the Eyes/Brows
The next step is to draw the eyes and eyebrows. Anime girls tend to have larger eyes than anime boys (This isn’t exclusive of course. Some anime girls have smaller eyes and some anime boys have larger eyes, in general, anime girls are drawn to have larger eyes)
The placement is simple. Divide the head into two equal parts, you can do this by separating the head with a horizontal line. Below that line (which should sit at the very middle of the head), draw the eyes.
Step 3. Draw the Nose
Anime noses are simple. They’re simply a tiny upright check that is placed below the eyes.
Step 4. Draw the Mouth
A simple mouth can be drawn by only one line. Some artists add a small space in between that line (for whatever reason). If you want an open-mouthed smile, draw an upturned D. Inside that D, draw a curve for the tongue. If you want to add teeth, simply add a small line at the top and bottom.
Step 5. Draw the Hair
The hair is the most important part of an anime character, if not the eyes. In some cases, the hair is what defines the character. Anime hair is usually made up of chunks of hair with pointed tips (unless the character has even bangs). Sometimes they even stick out and defy the forces of gravity.
The most simple type of anime hair on a girl is often one with bangs.
To get started with drawing anime or manga you need a drawing tablet and art program. So lets take a look at some good, beginner friendly options.
Here is our step-by-step guide for how to draw anime eyes. Drawing anime eyes should be simple and fun and we’ll explain how to do that with just these simple guides.
Anime eyes are a lot more expressive and exaggerated than realistic eyes. You should be able to easily see the emotion in a good drawing of an anime eye.
We will first go over some basic anime eye drawing tips and then go into how to draw a female anime eye as well as how to draw a male anime eye (there are some differences between the two that you should look out for*).
We’ve also included how to draw other features of the face like how to draw an anime nose, anime mouth, and anime hair.
Anime eyes are actually quite simple to draw since you can easily break the eye down into a few simple shapes and then add minimal detail to make them pop.
Let’s get into some tips and our step-by-step guides for how to draw anime eyes!
Finished product!
Tips for How to Draw Anime Eyes for Beginners
Before we begin, let’s start with some general tips for drawing anime eyes.
Don’t worry about trying to be realistic
Don’t worry about drawing the eyes too large
Put emphasis on the size of the eye, pupil, and highlights
Focus on bringing out the expression that you’re trying to capture
The most important thing you should know is that anime eyes are nothing like real eyes so it’s pointless to try and make them realistic. You should instead focus on the expression and the shape of the eyes.
In anime, the shape of the eyes can often tell you a lot about the character. For instance:
Shape
What They Usually Mean
Large, round
Optimistic, innocent, young, playful
Square, rectangular
Serious, mature, aloof
Small, sharp, triangular
Uninterested, been through hardships, emotionless
Anime eyes often add to the portrayal of the character’s personality.
Of course, this isn’t always the case. At the end of the day, the shape of an eye can be boiled down to artistic choice, regardless of the personality of the character. However, generally speaking, the eye shape has something to do with the character’s personality.
What Materials Do You Need to Draw Anime Eyes
If you are following along with these steps and drawing anime eyes in pencil you may need the below drawing materials and supplies:
There are three most common anime eye shapes and they are: round, rectangular, and triangular.
As I mentioned earlier, eye shapes in anime often indicate the character’s personality. For instance, if an anime character has huge round eyes, they will be portrayed as innocent and optimistic. Rectangular eyes are given to characters that are more mature and aloof.
Sometimes, the eye shape of an anime character changes depending on the emotion of the character. A great example of this is the popular anime character Gon from Hunter x Hunter. (SPOILERS! If you haven’t watched the show)
For the most part of the anime, Gon, who is a 12-year-old optimistic kid, has huge round eyes. His eyes help to portray his childlike innocence, but when the tides change and a tragic death causes Gon to “grow up”, not only does his entire personality change, but his eye shape also changes from round to rectangular.
This helps show the deadly shift in Gon’s personality. If Gon’s eyes were still round, it wouldn’t make as much of an impact.
That said, this isn’t always the case. After all, the eye shape of an anime character is an artistic choice. There are a lot of ways to add to the character’s personality like color schemes and wardrobe. Sometimes the eye shape doesn’t matter AT ALL, but for the most part, artists use different eye shapes to help depict the character’s personality.
To see how easy it is to draw eyes by figuring out the shape first, have a quick look at this video:
How to Draw Anime Eyes Step-by-Step Guide
To draw simple anime eyes, figure out the shape of the eyes first. For the sake of example, we will draw the typical round anime eye. Then draw the upper lash and the lower lash. The upper lash is thicker than the lower lash.
Next, draw a circle inside of the eye and a smaller circle for the pupil.
Color in the circle and then start shading the upper portion of the iris. Create a gradient-like effect by smudging the shade with your finger or a blending stump.
Create two smaller circles to mimic the light’s reflection on the eyes. This can be done by using an eraser.
How do you draw female anime eyes?
Female anime eyes tend to be rounder with less sharp angles. To draw female anime eyes, begin by sketching a round shape.
Next, use a curving upper lash line and a lower lash line. Make the upper lash thicker than the bottom lash of the eye.
Then, add an oval inside the eyes for the iris and make a smaller oval inside the iris for the pupil.
Color inside the pupil with your pencil then add a bit of gradient at the upper part of the iris by doing some shading and smudging. Then create small circles with your eraser to represent light reflecting off the eye. This adds life to your eye.
Lastly, add lashes to your drawing. This one is optional as sometimes anime eyes don’t have lashes, however, for the sake of example, we will add lashes to the eyes.
How do you draw male anime eyes?
Alternatively, male anime eyes have sharper angles and are smaller and sometimes less expressive. To draw male anime eyes, start with the shape of the eye first. Make them smaller and narrower than female eyes.
Make a thick upper lash line and a thin line at the bottom part of the eye. Most male anime eyes don’t have lower lashes.
Next, draw a circle inside of the eye and a smaller circle inside of it. This will be the iris and pupil
At this point, the process is basically the same as drawing a female eye. Color in the pupil, add a gradient at the upper part of the iris, and erase two small circles to represent light hitting the eye.
How do you draw anime eyes from different angles?
To draw anime eyes from different angles, the most important thing to do first is sketch the head at the angle you want.
Next, with the use of lines, draw the shape of the eyes first, based on the angle of the head
From there on, you can simply follow the same steps you did for drawing regular anime eyes. Thicken the upper lashes, draw circles for the iris and pupil, then shade and color.
How to draw anime nose
The nose of an anime character is probably one of the easiest parts to draw. In most cases, it’s either just a dot or a sideways “L”.
To add more detail to the nose, you can create a thin line from the bottom of the nose and have it curve all the way to the top. This will give the impression that the nose has depth. You can also add another dot to represent nostrils.
An anime mouth can be done by drawing a curved line, however, that’s only if you’re creating a simple smile.
If you want to draw an open-mouthed smile, first draw a side-ways “D”. Make the edges soft.
Then inside the “D”, draw a line on the upper part and a slightly curved line on the bottom. This will represent the teeth.
Next, draw an arc for the tongue.
To draw a toothy smile, repeat the same first steps. A sideways “D” with soft edges. However, for this one, make the D a lot more narrow than you would if you were drawing an open-mouthed smile.
Next, add a line in the middle going from one side of the D to the other. Make the corners thick while gradually making them thinner in the middle.
How to Draw Naruto
Naruto is probably one of the most, if not the most, recognizable anime character ever. So it would make sense for you to start your practice with him.
To draw Naruto, simply follow the steps I laid out earlier. Start with a circle and a line beneath it as a guide for the chin. However, notice that Naruto’s chin isn’t as sharp as most anime characters. Because Naruto’s face is a bit rounded, his chin is flat.
Tip: When drawing an anime character, always draw from a reference! Even if you know the character by heart, you’re still bound to get some details wrong.
Once you have the shape of his face down, time to draw the hair. Before you draw the hair, make sure to draw his headband first. To do this, draw two curved lines then connect them on the side with wavy lines to represent the folds of the headbands.
Then, inside the headband, draw a rectangle with rounded corners. This will be where the Leaf Village symbol will sit.
Once you have that, you can proceed with his hair. Naruto’s hair is sort of made up of jagged spikes. Of course, you can’t just draw jagged spikes on his head with no direction. Draw first a curved line that will guide where you draw the spikes of his hair. Then draw the spikes by creating jagged shapes.
Next, draw the eyes. The shape of Naruto’s eyes is something similar to a circle. Sketch the shapes first on each side of the face. Remember, the length between the eyes is approximately the same length of an eye.
Once you have the shapes down, start sketching. Draw the upper part of the eyes first with the outer line thicker than the inner line. Next, draw the lower part of the eyes which is just two slightly curved lines.
The inside of the eye is made up of a slightly elongated circle (not exactly an oblong but it’s on its way), a small pupil in the middle, and a half circle in the upper right corner that’s meant to be the white spot.
After you’re done with the eyes, add his eyebrows, which are just two thick lines pointing toward the middle of his face beginning from his headband. After that, add the rest of Naruto’s facial features, his nose, his mouth, and most importantly, his whiskers.
When you have the facial features out of the way, draw the ears, which are in line with his eyes and nose.
Lastly, draw his neck and his clothes. His neck is in line with the pupil of his eyes. Then add two smaller lines on the inside of his neck going on opposite directions. For his clothes, start with two rectangular shapes with a small space between them just below his neck.
Connect these shapes with a curved line going upwards (stop when it’s in line with his ears). Then, draw the rest of the collar using curved lines. you can even add an illusion of texture by drawing smaller lines inside of the collar.
Differences between Realistic Drawings and Anime Drawings
The difference between realistic drawings and anime drawings is that anime drawings tend to have more exaggerated features than realistic drawings. For instance, the eyes and head might be bigger, the noses might be smaller, and their hair might be immune to gravity.
All that cannot be seen in realistic drawings. Realistic drawings follow specific measures for certain features. They’re meant to replicate what’s observable in reality, and while anime drawings do take inspiration from reality, they are still based on fiction.
For anime, similar to cartoons, suspension of belief is required. But unlike cartoons, anime features aren’t overly exaggerated.
Is Drawing Anime Easier Than Realistic?
I’d like to think drawing anime is easier than drawing realism.
There’s a lot of detail that goes into realism, as well as a lot of accuracies needed. It only takes one small misstep in realism for your drawing to look off, but in anime, you can get away with a few small subtle mistakes.
When it comes to shading, realism is also a lot more complicated. Shading for realism requires highlights, mid-tones, and dark shades, all of which need to be blended flawlessly. For anime, shade is usually one solid color that’s darker than the original color that is being shaded.
Of course, there are some cases where blending is required, but most of the animes that you see on shows apply simple shading. So, personally, anime is a lot easier to learn and draw than realism.
That said, it all depends on which type of drawing you do more.
People who draw more realistic portraits will find that drawing anime can be a bit challenging, and people who only draw anime will struggle with realistic portraits. This is why, as an artist, it’s important to branch out and try different art styles, because no art style will come easy, especially if you’re doing it for the first time.
Is Drawing Anime Easy?
Drawing anime is definitely not easy.
Although earlier I said drawing anime is easier than drawing realism, drawing anime is definitely not an easy feat. Sure over time, with practice, it’ll eventually be easy, but when you’re just starting out and learning how to draw anime, it can be challenging.
Anime is drawn from fiction but that doesn’t mean it completely ignores reality. You will still have to apply proper anatomy, study perspectives, and even shading to get drawing anime right. Details in hair and character clothes are something you have to keep in mind as well.
So no, drawing anime is not a walk in the park. It’s still an obstacle course and there are many hurdles to get through. If you really want to get better at anime, I suggest, before jumping into drawing a character, to study anatomy first.
Once you understand basic anatomy, you’ll find the rest of the things you’ll have to learn a lot easier.
Drawing Anime Tips
Here are a few tips I have for drawing anime:
Learn the basics of drawing first (anatomy, shading, lighting, etc.)
Use references. It isn’t cheating. It’ll help you improve.
Don’t get stuck with one drawing. It’s natural to erase and go back but if you find yourself doing that a little too often for one drawing, accept the mistakes and move on.
Develop a practice routine where you try to improve on a specific aspect of anime drawing each time.
Use only one or two pencils. Anime drawing doesn’t really require a lot of shades so simply get your normal drawing pencil and a pencil with a darker shade.
Be patient. You’re gonna think it looks awful in the beginning, but the more you draw, the more you’ll get better. Eventually, you will no longer need a reference. So don’t give up.
How can I teach myself to draw anime?
There are many resources online that can help you to draw anime. For example, this article! If you’re more of a visual learner, there are also many videos on YouTube that can help guide you.
Like this one:
How to draw anime characters like a pro?
If you want to learn how to draw anime like a pro, first understand that every pro was once a beginner, just like you. With consistent practice, you’ll be just like your favorite manga artist someday.
Always practice with purpose. Don’t rush into things. The learning process is slow so if you start with learning how to draw anime facial shapes first, that’s fine. It’s important to not overwhelm yourself and focus on one thing.
Don’t be discouraged if you think your drawings are terrible. It won’t always be that way. You’re just starting out so it’s normal that you won’t get it correct right away.
In addition to that, try not to compare yourself to other artists. The easiest way to lose motivation is to look at a fellow artist’s work and judge your own work based on theirs. It’s always going to be different for each person so there’s no point in comparing yourself to another artist. Focus on your own drawing and your own progress and pay attention to nobody else.
Don’t take constructive criticism to heart. If someone offers you constructive criticism, know that it isn’t an attack on you as a person, it’s only an opinion on your drawing. Take their criticisms and learn from them.
No professional is born a master. Most, if not all of them, worked hard to get to the skill level they’re currently at. And if you want to be like them, then you gotta put in the work and practice. Soon enough, you’ll be considered a professional as well.
Key Takeaways on What You Need to Draw Anime with Digital Tools
Again, to draw anime you need:
an art program
a drawing tablet (or even your mobile phone)
Some good options for free* beginner art programs are:
Ibisx Paint (can be used on your mobile phone or iPad)
Krita (for drawing on your computer)
We recommend avoiding more advanced art programs since they may discourage you with all of their advanced options*
Good beginner and affordable drawing tablets are: (these you will have to connect to your computer)
A good starting place is by drawing simple anime faces and figures from references (some good options for characters to draw are Luffy, Saitama, Naruto)
Lastly, try not to worry about mimicking a specific anime style initially. The best anime artists have a strong foundation in drawing so try to learn some basics of art including drawing figures, faces, proportion, spacing, and shading
Our Affordable Recommendation for Drawing Anime and Manga:
One of my very first digital art that I made on Ibisx Paint
Choosing Your Digital Art Tools
Just like traditional drawing, digital art requires tools. Some are paid and some are free. If you’re a beginner, I highly recommend using free tools. Even though they may be limited compared to paid tools, they have enough of what you need to get started.
Plus more premium digital art apps may be frustrating to use as a beginner since they can be pretty complex and offer so many features
Again, the most important tools that you should start with when it comes to digital art before worrying about anything else are a drawing tablet and an art program.
Drawing Tablets
You should start with more affordable drawing tables (we strongly recommend avoiding an iPad as your first drawing tablet).
Just choose one that is inexpensive and easy to carry around.
Before getting a tablet, I was mostly drawing on my phone using my finger. It was fine for practice but the process was a lot harder than when I started using a tablet.
Some good options for beginner drawing tablets are:
Veikk A30
HUION Inspiroy H1060P
Wacom Intuos Tablet
Veikk A30
My first tablet was the Veikk A30, a light and sleek tablet with a 10 x 6 inches drawing area.
Our Overall Review: The Veikk A30 is a good entry-level tablet for beginners due to its affordability and large drawing area. Its sleek design and portability make it a great choice for artists who need to work in different locations. However, since its cheaper and not as popular as the other brands there may sometimes be driver issues.
Pros
Cons
Affordable and budget-friendly
Less well-known brand may affect support
Sleek and portable design
Potential driver stability and compatibility issues
Large 10 x 6 inches active drawing area
Build quality may not be as high as more expensive tablets
OurOverall Review: The HUION Inspiroy H1060P is a pretty feature-rich platform for beginners with its high pressure sensitivity and expansive workspace. The customizable keys are a nice touch for workflow efficiency, though they may take time to master. The pen’s charging requirement is a minor drawback, but overall, the tablet is a decent tool for people starting with digital art.
Our Overall Review:The Wacom Intuos Tablet is a somewhat premium option for beginners who want a reliable and long-lasting tool. It is smaller but does include some great easy to use software. While it may a little be more expensive, the investment is pretty justified by Wacom’s reputation for quality and customer support.
Pros
Cons
Reputable brand with industry standard quality
Higher price point than some beginner tablets
Comes with creative software bundle
Durable build quality
Compact and portable
Digital Art Programs
Getting a program that is expensive and has a high learning curve has a chance of demotivating you and causing you to resent or even abandon the learning process.
I suggest programs that are free and open source.
If you’re using your mobile phone, you can use apps like Ibisx Paint, which is a free easy-to-use drawing app.
If you’re looking to draw on your PC, programs like Krita will be a big help as not only is it free, but it also has a pretty intuitive user interface.
I used to draw on Ibisx Paint until I got my first drawing tablet. Although the results were not that pretty, it still gave me the opportunity to practice and learn digital art.
Here’s some quick pros and cons for our recommended apps:
Ibis Paint X
Pros
Cons
Intuitive user-friendly interface
Ads in the free version can be distracting
Strong community and social media integration
Limited advanced features for professional use
Free version available with many features
In-app purchases for additional features
Recording feature to capture the drawing process
Krita
Pros
Cons
Completely free and open source
Can be resource-intensive on some systems
Professional-grade advanced features
Somewhat steep learning curve for beginners
Highly customizable interface and brushes
Less optimized for touch input compared to other apps
Supportive community and frequent updates
Clip Studio Paint
Pros
Cons
Tailored for comics and manga with specialized tools
Not free; the full version is relatively expensive
Advanced brush engine for detailed artwork
Complex interface with a learning curve
Supports the use of 3D models
Basic animation features included
Other Digital Art Tools
Once you’ve chosen your tablet and program, you can then think about other digital art tools like:
Styluses: One must ensure they have a comfortable grip and pressure sensitivity that matches their drawing style (these often come with tablets)
Gloves: Drawing gloves can help reduce friction between the hand and the tablet.
Monitor Stands: For those using display tablets, adjustable stands can help maintain a comfortable drawing posture.
Desk Setup: A well-arranged workspace can prevent strain and support long hours of work (an organized desk space can do wonders for your productivity…coming from a messy desk person*)
Digital Drawing Process
It’s always good to have a process when making an artwork. It makes drawing a lot smoother and easier.
First, you gotta come up with what you want to draw.
Personally, I get inspiration from things I like. I love to make fan art so if I want to draw and I have nothing in mind, I look to my favorite shows and movies to get ideas.
This is a fan art I made of Kurapika, my favorite anime character from the show Hunter x Hunter. I got this idea after I watched that scene of him being angsty in a river.
If you want to draw and have no idea, I suggest pulling up your favorite show or anime and picking a scene that you can recreate with your own interpretation.
Next, I do a quick sketch of my idea. It’s usually messy and most lines overlap, but that’s the point of the sketch. To get a quick visual of your idea. If you’re new at this, you can make your sketches look even messier. Don’t be afraid if it looks nothing like what you actually wanna draw. You’ll be polishing it later. Some artists draw only stick figures as sketches.
After the sketch, I clean it up by outlining. The outline does not have to follow the sketch 100%. You’re still free to change and tweak things at this stage. You can also make your outline more detailed than your sketch.
I usually follow my sketches but sometimes I experiment and my outlines end up looking better than my sketches.
Once I’ve finished outlining, I then add the flat colors. Colors can be tricky as they can make or break your art. Luckily for me, this is a fan art. Which means the colors are already there, I just have to pick them.
If you’re a beginner and are looking to practice with your colors, doing fan art will be a great help.
But don’t just draw and copy what you see, make sure you understand why the artist picks those colors and how you can learn from them.
When I’m done with the flat colors, I move onto shading and highlights! You don’t actually have to do this, especially if you’re making simple fan art, but shading and highlights can make your drawings pop so I recommend you add them.
If you don’t know how to shade, we have an article discussing how to shade and the different shading methods. You can read that here: Why is Shading So Difficult?
After shading and a couple more tweaks, I add the background. In this case, it’s simply a flat red color since red is often associated with the character I drew.
If you’re looking to practice and not just create fan art, I highly recommend adding a background that isn’t just a flat color or simple shapes. One of the struggles of digital art (or art in general) is the background, so learning to draw background early on in your learning process will make things a lot easier for you.
Setting Up Your Workspace
If you plan to draw a lot then you must have a space where you can go to and draw. It doesn’t have a be another room of the house (although if you can you should) it can just be a table where you can set up your computer and tablet to draw.
My workspace was a small study table. It was pretty crowded but it worked for me as I was able to draw just fine. As long as there is space for your arm, your tablet, and your computer, it should be enough.
That said, it’s important that your space is clean and your environment is peaceful. Being in a noisy environment can be distracting, which may take away your ability to come up with a creative idea.
Understanding Anime Art Style
Anime art style is characterized by its vibrant characters and vivid worlds, which can be captured effectively using digital art tools.
The key elements of anime art include:
Eyes: Anime characters typically have large, expressive eyes. Each character’s emotions are often conveyed through the eyes, making their design a crucial component.
Hair: From gravity-defying spikes to flowing locks, anime hair is diverse and creative, allowing artists to explore a wide range of styles and colors.
Proportions: While anime borrows from real-life proportions, it often exaggerates certain features, like big eyes or elongated limbs, to express character traits or emphasize certain emotions.
Line Work: Crisp and varying line weights play a significant role in defining the shape and depth of anime characters and objects.
When starting with digital anime art, artists should prioritize understanding these elements:
Element
Importance
Proportions
Forms the basic structure of characters and helps in maintaining consistency.
Line Quality
Determines the clarity and finish of the characters and scenes.
Color Theory
Vital for setting the mood, defining character, and distinguishing between scenes.
Basic Drawing Skills and Techniques
Developing proficiency in basic drawing skills and techniques is critical for an artist aiming to produce compelling digital anime art. Mastery in areas such as anatomy, line work, and color greatly influence the quality of the final piece.
Proportions and Anatomy
Understanding proportions and anatomy is fundamental when drawing anime characters. Characters should maintain consistent proportions throughout their design which is generally more stylized than realistic drawings.
Head-to-Body Ratio: Anime characters typically have a head-to-body ratio of 1:6 to 1:8, unlike the realistic 1:7.5 to 1:8 ratio.
Facial Features Placement: Eyes are usually halfway down the head, with a smaller nose and mouth placed below them.
Line Art and Shading
Line art creates the clean edges and shapes that define anime illustrations. Mastery of line weight varies the visual impact.
Thick lines denote shadows and outer edges.
Thin lines suggest light sources and detailed features.
Shading adds depth:
Identify a consistent light source.
Apply shading opposite the light to depict volume and form.
Color Theory and Application
Color Theory is essential in choosing a palette that conveys mood and time of day.
Primary colors (red, blue, yellow) form the basis of all hues.
Complementary colors (opposite on the color wheel) create dynamic effects.
When applying color:
Begin with base colors, typically mid-tones.
Layer shadows and highlights to build form.
Adjust saturation and brightness for harmonic or contrasting effects.
Character Design and Development
Expressing Emotion and Personality
Each anime character should embody distinct emotions and personality traits that are visually communicated through their design. Artists achieve this by:
Eyes: The window to a character’s soul, eyes in anime are often oversized and can exhibit a wide range of emotions. For a determined character, eyes might be drawn with sharp, angular lines, while a gentle character may have eyes with soft, rounded edges.
Facial Features: Subtle changes in the character’s mouth and eyebrows can convey different emotions. A slightly curved upward mouth can indicate happiness, and furrowed brows can show concern or anger.
Costuming and Accessories
A character’s outfit and accessories provide context about their background, role, and personality. They consist of:
Outfit: This is not only about style but also function. A warrior might have armor, while a magician could don robes with mystical symbols.
Accessories: These can include items like jewelry, weapons, or gadgets. A character’s accessories should have a purpose or signify an aspect of their personality, like a locket for a sentimental character or a futuristic gadget for an inventor.
Through these elements, artists develop engaging anime characters that connect with audiences.
Backgrounds and Environments
Drawing anime backgrounds and environments requires a fundamental understanding of perspective and how characters integrate into these spaces. These elements help create a cohesive and believable anime world.
Perspective Basics
One-Point Perspective:
Usage: Ideal for scenes where the viewer is directly facing the background, like a straight road or hallway.
Construction: A single vanishing point is placed on the horizon line.
Two-Point Perspective:
Usage: Effective for corner views, such as looking at the edge of a building.
Construction: Two vanishing points are placed on the horizon line, typically at the edges of the paper or canvas.
Three-Point Perspective:
Usage: Used for dramatic scenes, like high skyscrapers viewed from ground level or a bird’s eye view of a landscape.
Construction: Incorporates a third vanishing point either above or below the horizon line.
Overlay a grid to understand how objects sit in space.
Progress to more complex structures as confidence increases.
Incorporating Characters With Backgrounds
Scale and Placement:
Characters should be drawn to scale with their surroundings to maintain proportionality.
Placement is crucial; characters closer to the vanishing point will appear smaller.
Interaction:
Characters need to interact with the environment, such as sitting on chairs or casting shadows.
This interaction grounds the characters and adds realism to the scene.
When drawing both characters and backgrounds:
Consistency in light source, shading, and texturing must be maintained throughout the piece.
Use layers if working digitally to adjust elements independently.
Practice and Improvement
Mastering the art of drawing anime digitally hinges on consistent practice and the ability to apply constructive feedback to one’s work.
Regular Exercises
Daily Sketching: Commit to drawing something every day, even if it’s a simple sketch. This could range from replicating anime characters to creating unique expressions or poses.
Anatomy Studies: Spend time drawing different parts of the body to understand proportion and movement.
Expression Variation: Work on a variety of facial expressions to convey emotion effectively.
Pose Practice: Use reference images to capture challenging poses and ensure dynamic illustrations.
Drills and Repetition: Focus on repeating difficult elements until they become comfortable.
Hands and Feet: They are notoriously tricky, so dedicate sessions purely to these areas.
Eye Styles: The eyes are central to anime characters, practice various eye designs to find a preferred style.
Seeking Feedback and Critique
Community Engagement:
Join online forums or social media groups where artists share their work.
Actively seek critiques, not just praise, to identify areas for improvement.
Professional Input:
Consider online courses or workshops that offer personalized feedback.
Explore opportunities for portfolio reviews by experienced anime artists.
Iterative Process: Use the feedback received to rework pieces multiple times, focusing on improving one aspect at a time. This methodical approach solidifies learning and leads to visible progress.
Sharing Your Work
After creating digital anime art, an artist’s journey continues with showcasing their creations. Selecting the right online platforms and strategies for building an audience are crucial steps for exposure and networking.
Online Platforms
Artists can share their digital anime work on various online platforms designed to reach both general and niche audiences. DeviantArt and ArtStation are two prominent websites that cater to artists across multiple genres, offering community engagement and the potential for discovery. Instagram and Pinterest appeal to a broad audience and utilize visual-centric mechanisms which can boost visibility. For anime-specific content, platforms like Pixiv, a popular Japanese online community for artists, provide a more targeted audience.
DeviantArt
ArtStation
Instagram
Pinterest
Pixiv
Building an Audience
Building an audience starts with consistency and engagement. Artists should regularly post their work and interact with their followers to foster a community. Utilizing hashtags relevant to anime and digital art helps to increase visibility and attract viewers with similar interests.
Engagement Tips:
Regularly update your portfolio with new art.
Respond to comments and messages to build relationships.
Share behind-the-scenes content to give audiences insight into the creation process.
Collaborate with other artists to tap into different follower bases.
On average, it can take about 2-3 years of consistent practice to learn to draw anime.
However, drawing anime can definitely be challenging and some even struggle with it when compared to other drawing styles.
Anime characters often have exaggerated eyes, distinct features, detailed designs, and sometimes very unique* proportions…(we’re looking at you Baki and Code Geass).
*All anime drawings in this post are by our Content Creator: Ren*
Ren’s anime drawing at ~1.5 yearsRen’s drawing at ~3.5 years
So in this post we breakdown other related questions as well as some top tips on how to learn to draw anime plus where exactly to start.
Key Takeaways
It can take about 2-3 years of consistent practice to learn to draw anime
(this timeline can obviously be sped up with more practice – if you can dedicate 3+ hours to practice a day, you can easily become a very skilled anime artistby the one year mark)
First, focus on a specific anime style you want to draw (there are vastly different anime styles – consider One Punch Man vs Gyakkyo Burai Kaiji)
The most common tip you’ll probably hear is to learn the basics. You can’t just jump straight into drawing anime without first learning the fundamentals.
Learning to draw anime won’t take you a day. If you want to improve, it’ll take you months, sometimes even years, of consistent practice, and even then, you won’t be entirely satisfied with it.
1.Your biggest enemy will be imposter syndrome. No matter how much you’ve improved, a small yet powerful voice in the back of your mind will be dragging you to a hellish hole of self-doubt. You’re gonna wanna overcome this as it will only slow you down.
2.Your second biggest enemy will be anatomy. Although anime characters have exaggerated features, they still follow basic anatomy. When you first start out drawing anime, you will be inclined to eyeball it and draw off vibes but that’s not how it works. Save yourself the years and LEARN ANATOMY.
Once you’ve mastered anatomy, then you’re free to pick a specific anime style and experiment with your art. I suggest starting with a simple anime style first, especially if this is your first time.
After that, all you need is to draw and practice consistently.
Here are a couple of things:
1. Learn Anatomy
I cannot stress enough how important learning anatomy is when it comes to anime. It may not seem important at first and you may brush it off on the account that learning it is kind of boring, but learning it will save you so much time in the future.
The thing about anatomy is that when you’re eyeballing it, you can’t really tell what’s wrong. Unfortunately, others can and they will point it out to you. Learning anatomy will also make drawing dynamic poses easier. Once you’ve figured out what each part of the body is supposed to look like, drawing them in a way that’s more fluid will come naturally.
2. Use Reference Images
There seems to be an unspoken and incorrect rule in the art community that using reference images is “cheating”. It’s not.
Using reference images will make the learning process go a lot faster. Think of it as a guide. Without it, you will have no idea how your drawing is supposed to look. But with it, not only will you know but if you do it enough, you’ll remember to the point where you will no longer need it.
That said, using a reference image does not mean copying an image and claiming it as your own. That’s plagiarism. A reference image should only be there to show you how something like a pose is supposed to look like.
It’s up to you as the artist to interpret that reference in your art.
3. Experiment with Different Art Styles
The cool thing about anime is that there are many different art styles to choose from. There are animes with simple and basic styles and animes with complicated looks. There are even some that stray from the typical anime look and are more experimental.
If you wanna draw anime, you’re gonna have to experiment with different art styles to see which one works best for you. Even if you’ve already decided on an art style, it won’t hurt to explore and practice other art styles.
4. Learn About Composition
Learning about composition will not only help you to improve on drawing anime but will improve your overall art in general.
Composition refers to the way all the elements of your artwork are arranged. The goal is to make sure each element complements the other and makes the main subject stand out. If you’re bad at composition, it doesn’t matter how well you draw each element, if they’re arranged in a way that’s jarring to the eyes, your art is gonna be bad.
5. Take Criticism
When it comes to criticism, the art community can be harsh, sometimes downright cruel. You don’t have to accept every criticism that comes your way, in fact, it’s probably best if you ignore them. But if the criticism comes from your art teacher, mentor, or even your friends and family, it’s important to keep an open mind.
The criticism is there for a reason. It’s to help you improve. Remind yourself that it’s not a personal attack but simply a comment on how you can do better next time.
Understanding Anime Drawing Fundamentals
Grasping Basic Anatomy
To draw convincing anime characters, an understanding of human anatomy is essential. Anime artists must know how the human body is structured and how it moves and then figure out ways to alter or bend reality in terms of realistic anatomy and proportion.
This includes familiarity with:
Gesture Drawing: practicing and how the body moves will be extremely helpful when drawing anime
Proportions: Commonly, an anime character’s height is measured in heads. While a real human might be 7.5 heads tall, an anime character might range from 6 to 8 heads tall, depending on the style.
Musculature: Although stylized, knowing where muscles are and how they appear in different poses is crucial for creating dynamic characters.
Skeletal Structure: A basic knowledge of the skeleton helps in getting the posture right.
Mastering Facial Expressions
Facial expressions in anime are vital for conveying emotion and character personality. Artists focus on:
Eyes: Often oversized compared to real human eyes, they are expressive and can indicate a wide range of emotions.
Shape
What They Usually Mean
Large, round
Optimistic, innocent, young, playful
Square, rectangular
Serious, mature, aloof
Small, sharp, triangular
Uninterested, been through hardships, emotionless
Anime eyes often add to the portrayal of the character’s personality.
Mouth and Eyebrows: Small changes in the shape and position of the mouth and eyebrows can signify different feelings.
Using a simple emotions chart can assist artists in practicing various expressions.
Learning Clothing and Accessories
The right clothing and accessories bring an anime character to life, reflecting their personality and story. Artists must consider:
Clothing Folds: Understanding how fabric drapes and folds according to body movement and wind is important.
Accessories Detailing: Items like jewelry, weapons, or tools add depth to a character’s backstory and need to be drawn with careful attention to detail.
These attributes, when mastered, serve as the stepping stones to developing one’s unique anime drawing style.
Exploring Drawing Tools and Materials
Choosing the Right Pencils
For anime sketches, artists typically use a range of pencils from hard graphite (H grades) for light, rough sketches to soft graphite (B grades) for deep shading and bold lines.
We recommend using an HB pencil for lighter lines and lighter shading and a 4B pencil for darker lines and darker areas of shading.
HB pencils are a pretty balanced choice for general work. A typical set might include H, HB, 2B, and 4B pencils to accommodate various shading techniques and line work.
Selecting Paper Quality
The paper quality is crucial as it interacts with the pencil to define the line work and texture of the drawing. Heavier paper weights, such as 80 lb or 100 lb, are ideal as they handle erasing well and don’t crumple easily. Smooth to medium textures work best, providing a uniform surface that allows for fine lines and avoids the grainy appearance.
Digital tools make drawing anime easier. If you don’t know where to start, here are some common tools and software that a lot of digital artists use.
Software
Photoshop (Paid) – Although Photoshop is mostly known to be used for editing and manipulating photos, it can also be used for digital art. It is limited though in terms of what you can do with it but it’s good enough for beginners.
Clip Studio Paint (Paid) – Clip Studio Paint is perfect if you’re learning to draw anime or manga. This software is designed for artists who make comics but it also works with simple digital art. The great thing about this is that it has assets that help you with dynamic poses as well as brushes to help make shading or adding details easier.
Krita (Free) – Krita is a great tool for beginners. If you can’t afford Photoshop or Clip Studio Paint then Krita is here for you. Unlike Photoshop, it’s not designed to edit photos. It’s an open-source program made exclusively for artists.
PureRef (Free) – PureRef is not exactly for digital drawing but it is useful for digital artists. It allows you to store references and move them around while you’re drawing. This is perfect if you find having to go online for a reference every time to be a hassle.
Drawing Tablets
Wacom– Wacom is a popular brand of drawing tablets. Many digital artists flock to this brand. If you’re starting out and you don’t know what brand to get, Wacom is always a safe bet. I suggest going for Wacom Intuos if this is your first time getting a tablet.
Veikk– Although Veikk is not as well known as Wacom, it’s a good tablet for a beginner and a lot cheaper than Wacom. Veikk was my first drawing tablet and it has allowed me to draw many digital artworks.
Huion – Huion is also a well-known brand of drawing tablets. It’s cheaper than Wacom but more expensive than Veikk. You can create the same quality of art on a Huion tablet as you can with a Wacom, however, some have argued that the pen sensitivity of Huion is a lot less accurate than that of Wacom.
Apps
Ibis Paint X (Free/Paid) – Every digital artist has had their start on Ibis Paint X. It’s a free mobile app on Android that lets you draw and paint. It has an impressive selection of brushes however, most of them are locked unless you pay for premium.
Infinite Painter (Free/Paid) – Some have said that it’s the best drawing application on Android as it is somewhat similar to art software on a PC. It is a bit buggy though, especially if your phone isn’t Samsung, but the developer is known to be responsive to queries and issues.
Procreate (Paid/For iPads only) – Procreate is a great digital art app especially if you’re into animating. It allows for an easy way to fill in colors and smoothen shaky lines. Unfortunately, there’s no free version and it’s only available on iPads so if you have an Android, I suggest using Ibis Paint X instead of Infinite Painter.
Setting Realistic Goals and Expectations
When learning to draw anime, setting realistic goals and expectations is crucial for a learner’s progress and motivation. Individuals often vary in the time it takes to master anime drawing, with typical timeframes ranging from one to three years.
Obviously, factors influencing this timeline include the daily practice duration and the learner’s dedication. In my own art journey after ~2.5 years I felt pretty good about my drawings with practice ranging from 1-3 hours each day.
A beginner should consider the following aspects to set achievable goals:
Daily Practice: Consistent practice is key. For an hour of daily practice, acquiring proficiency might take approximately three years. Increasing practice to three hours a day can significantly shorten this time.
Skill Level Goals: Beginners should aim to grasp basic anime drawing elements before progressing to more complex techniques.
Training Approaches: A structured approach with step-by-step guides and classes can facilitate quicker learning.
Patience with Progress: One may face plateaus in skill advancement. Maintaining steady effort during these periods is important.
In summary, learners should:
Identify their available time for practice.
Set specific, measurable goals based on skill level.
Choose a suitable training method.
Remain patient and persistent, acknowledging that skill development is not linear.
Practicing Key Drawing Skills
Developing Line Work and Shading
Line work forms the foundation of anime art, necessitating a steady hand and the ability to convey form through contour lines. An artist should practice:
Straight lines: Ensure they are smooth and vary in thickness.
Curves: Work on smooth and consistent curved lines.
Shading adds depth to the art, and one should focus on two aspects:
Gradients: Create smooth transitions from light to dark.
Cross-hatching: Learn this technique for depicting shadows and tones.
Enhancing Observation Skills
Observation is crucial for translating real-world inspiration into anime art. To enhance this skill, you should:
Spend time studying their subject matter closely by watching anime or studying manga.
Experimenting with Styles
Anime comes in various styles, and artists should:
Explore different character designs and motifs.
Experiment with both traditional and unconventional anime styles to discover a personal niche.
By mastering these practices, artists will improve their craft and move closer to creating compelling anime drawings.
Engaging with the Anime Community
Engaging with the anime community can be an essential step for artists seeking to improve their anime drawing skills. It provides opportunities for feedback, inspiration, and growth.
Participating in Online Forums
Online forums serve as hubs for anime enthusiasts and artists to share their work and discuss techniques.
While you are likely already aware of these platforms site’s like Reddit’s r/anime or DeviantArt offer sections where one can post drawings and solicit critiques from peers. Constructive feedback from these communities can be invaluable for artists at any skill level.
Some Key Forums:
AnimeArt – A subreddit focused on sharing and discussing anime art.
DeviantArt – An online community showcasing various art forms with a dedicated anime section.
MyAnimeList – Known for anime reviews, it also includes forums for fan art.
Time Management and Practice Routines
Establishing a consistent practice schedule is pivotal for those learning to draw anime.
We recommend dedicating at least one hour daily to practice if possible. Remember consistency is key – even if you can only draw for 15 or 30 minutes its worth it.
For those aiming to accelerate their learning curve, increasing the daily practice time can be beneficial. Practitioners drawing for about three hours a day can improve very rapidly in as little as one year.
We also suggest focusing on a practice routine such as the one below:
Day
Task
Time
Monday
Basic Shapes & Lines
1 hour
Tuesday
Character Anatomy
1 hour
Wednesday
Facial Expressions
1 hour
Thursday
Clothing and Drapery
1 hour
Friday
Hair and Accessories
1 hour
Saturday
Applying Color and Shadows
1 hour
Sunday
Review and Free Drawing
1 hour
A structured approach allows learners to cover various aspects of anime drawing systematically. It’s also highly beneficial to use references for practice, as this helps in understanding proportions and style specifics of anime characters.
Self-assessment is a critical part of the learning process; students should regularly look back on their old work to not only identify areas of improvement but look back at how far they’ve come.
Progress Tracking and Milestones
When learning to draw anime, it’s crucial to set clear progress tracking mechanisms and identify milestones to gauge one’s development effectively.
Here is a sample timeline that you can help guide your own practice and learning:
Initial Months (1-3 Months):
Basic shapes and lines: Mastery of circle, square, and triangle forms.
Facial features: Simplistic eyes, noses, and mouths.
Checkpoints (3-6 Months):
Character sketches: Full rough anime character outlines.
Advanced anatomy: Detailed hands, feet, and clothing wrinkles.
Dynamic poses: Characters in various action stances.
Proficiency Goals (2+ Years):
Complex scenes: Full compositions with backgrounds and multiple characters.
Unique style: Developing a personal anime drawing style.
Finally we also recommend keeping a log or portfolio. You will be blown away at how quickly your drawings improve with consistent practice.
Frequently Asked Questions
What are the best tools or software for beginners interested in drawing anime digitally?
For beginners, we recommend using affordable tools like the Veikk A30 drawing tablet and Krita, a free drawing software.
Could you recommend some fundamental techniques for drawing anime characters?
Beginners should focus on mastering facial features, such as the distinctive large eyes, small mouth, and expressive facial expressions typical in anime. Additionally, understanding the importance of hair in character design is crucial, as it often sets the tone for the character’s style and personality.
What resources are available online for learning to draw anime in a digital format?
A myriad of online resources are available, including step-by-step tutorials, drawing classes specifically tailored for anime art, and video guides that cover everything from character design to digital painting techniques.
How can someone practice and improve their digital anime-style art?
Constant practice is key; sketching regularly, studying from real life and other anime works, and soliciting feedback can significantly refine one’s skills. Digital artists often keep a portfolio of their progression to track improvement over time.
Are there any specific apps that are helpful for creating anime digital art?
Besides the software mentioned above, apps like Adobe Photoshop remain a staple for many digital artists. While they may be a bit too complex for beginners, they provide extensive tools and features that cater to the refined detail of anime drawings.
Is it possible to self-learn digital anime drawing, and if so, how?
Self-learning is entirely possible with the wealth of educational content available online. Beginners can self-teach by following online courses, engaging with community forums, and practicing the application of various digital art techniques learned through these platforms.
What are the first steps to take when learning to draw anime?
An aspiring artist should start with the basics of drawing, such as understanding anatomy and proportions, before moving on to the distinctive features of anime characters like large expressive eyes and stylized hair.
Can self-taught artists become proficient in anime illustration, and how?
Yes, self-taught artists can become proficient in anime illustration. They can do so by consistently practicing, studying from existing anime art, and using online resources and tutorials to refine their skills and style.
What is a realistic timeline to become competent at drawing anime for a beginner?
A beginner can expect to become competent in drawing anime within two to three years with regular practice, such as one to three hours daily. However, the timeline varies with individuals’ dedication and learning pace.
What are the key skills to focus on for improving anime drawing quickly?
Artists should focus on anatomy, especially facial features and expressions, as well as mastering dynamic poses and creating clean, confident lines to improve anime drawing more rapidly.
How much practice is typically needed to create a professional anime character?
Creating a professional anime character typically requires hundreds of hours of practice. Artists need to refine their grasp on proportions, character design, coloring, and shading to reach a professional level.
What are effective strategies for reducing the time it takes to complete a manga chapter?
Effective strategies include planning the chapter layout in advance, streamlining the drawing process with templates or digital tools, and focusing on consistency rather than perfection to efficiently progress the storytelling.
Ren is an artist who has been drawing from the moment she could pick up a pencil. If she’s not on her computer or stuck with a book, she’s drawing and or thinking about drawing. She’s also a computer science student with an addiction to video games and comic books.


Leave a Reply